
Hello, friends! It’s been a disgracefully long time since we last saw each other, and for that I apologize. I’d love to tell you that I’ve been away visiting exotic locales and falling madly in love with a mysterious mustachioed man but alas; I’ve simply been overworked and under-motivated to do much of anything worth writing about!
I really didn’t think I’d have a new post at all this year (how pathetic my life is…) but then October came along and I got the familiar little tingle down my back that means only one thing… HALLOWEEN APPROACHES!
Last year’s Halloween was a little lackluster (I can’t even remember what I dressed up as but I imagine it was probably a Hogwarts student) so I decided to make up for it this year and go all out with a big costume. I had a difficult time trying to nail down a solid idea. This one was too complicated, this one too frilly, this one not big enough, this one too obscure. It was a long few days of frustrated head scratching. But then, inspiration struck. I had returned home from a brutally exhausting day at our local renaissance faire and was stripping off my newly bought bodice when I noticed it was reversible. The beautiful dark floral I’d been sporting all day flipped around to reveal the most pristine mint green corduroy and, like a scene from That’s So Raven, I could see in my mind’s eye my Halloween costume coming to life.
Samwise Gamgee.
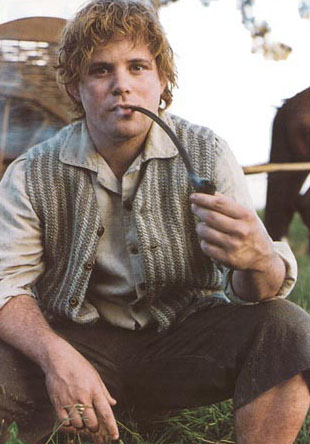
Ahh, Sean Astin. I love you so.
I’d been toying with the idea of a hobbit cosplay for almost two years and had even purchased big rubber monster feet slippers from Amazon, but the motivation for that build had fallen apart after the rather disastrous debut of my Femme Rocket Raccoon. But here was this bodice, in the perfect shade of green-grey, with the perfect subtle striping, and I knew it was a sign from Tolkien himself.
I was going to gender-bend Samwise Gamgee into Sammoon Gamgee, and it was going to be glorious.
And so I went to work. Four weeks and around $150 of supplies later, and I had a really great costume that I was proud of (even if it was ten years too late for most people to recognize). I didn’t take as many progress photos as I probably should have, but here’s what I have; I’ll try to fill in the blanks as best I can!
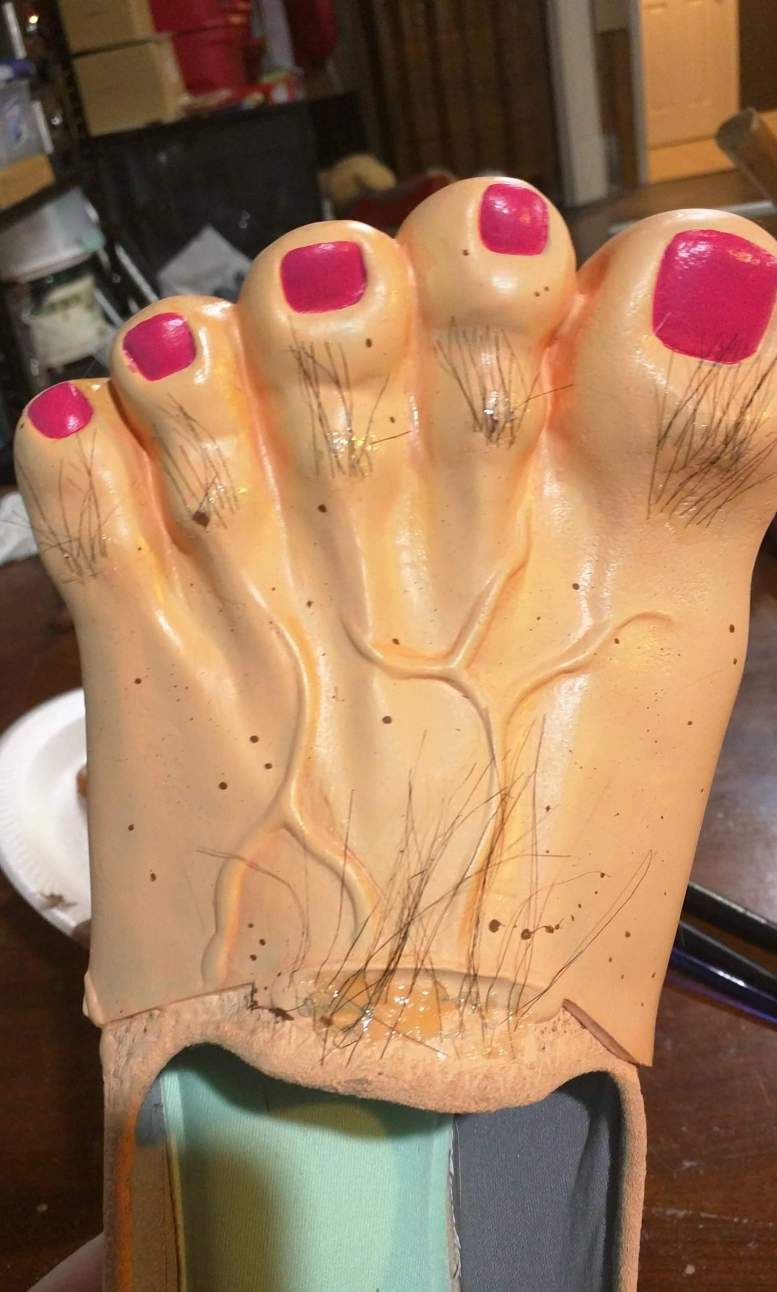
We’ll start with the feet. A couple of years ago I found these on Amazon:
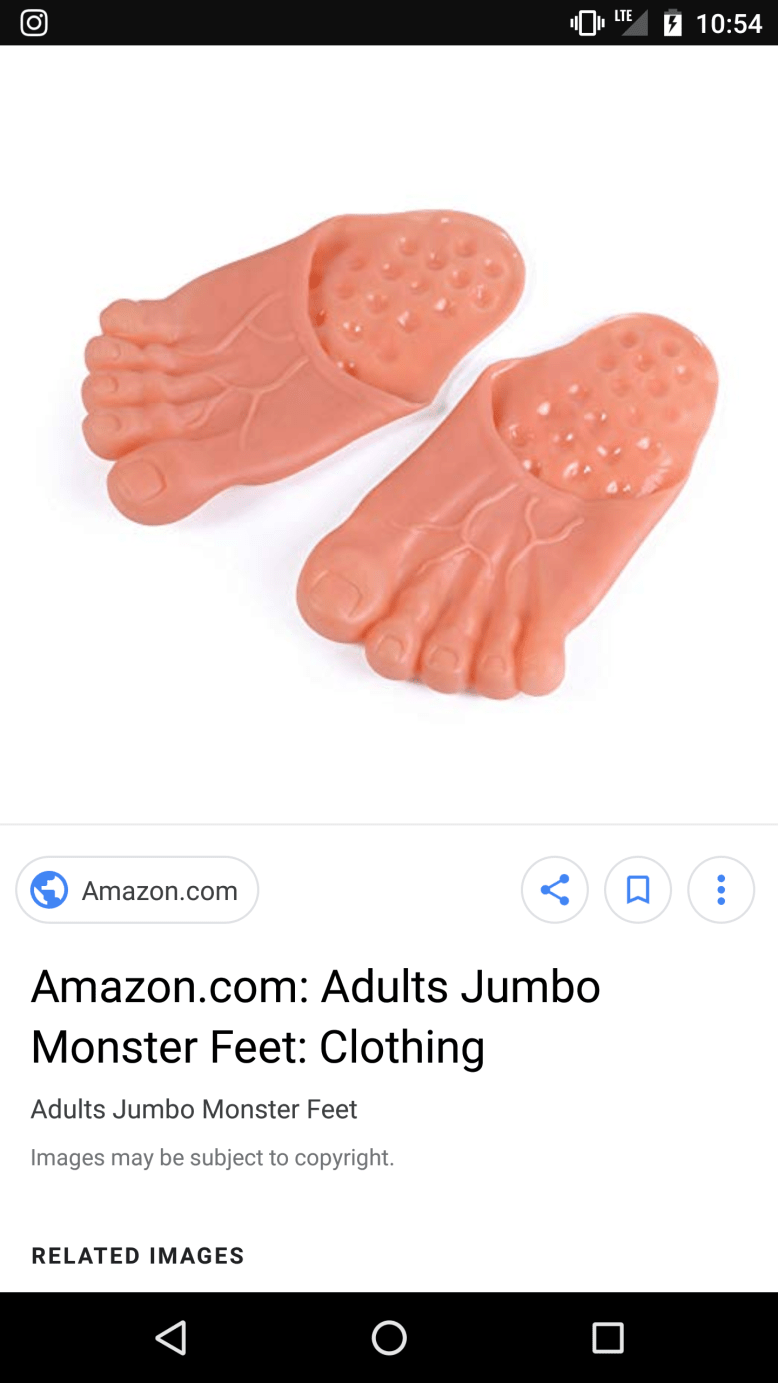
They’re a hard, flexible rubber slipper with hard nubs on the bottom. The original idea was to cut off the heel flap (it was incredibly uncomfortable to walk on), and glue the leftover “cap” onto a slim-line shoe like Ked’s, Tom’s, etc. Unfortunately for me, I couldn’t find a shoe slim enough, or maybe my feet are just too large, to allow the cap to sit where I needed on the shoe. It looked wildly disproportionate with my anatomy. During test fittings, the cap sat too far forward and it made the feet comically long and narrow, rather than the over-sized and chunky I was aiming for. So I bit the bullet and cut the entire bottom of the slipper away, leaving behind the toe structure and the top “flap.” This allowed me to position the toes where I needed them. I attached the flap to the top of the shoe with a combination of hot glue and E6000 and clamped the pieces together overnight with metal clamps and binder clips.

After the adhesive cured, I mixed acrylic paint into a flesh tone (I used my foundation as a color guide) and laid down a base coat over the entire thing. In hindsight, I should have sealed the shoes with Plasti Dip before painting because I spent a lot of time and wasted a lot of paint trying to smoothly cover the mesh-like side material on the shoes. Oh well. I did two or three coats of the flesh-toned paint and then came back in with a slightly darker flesh tone to give more dimension between the toes and along the ugly veining. I’m not the most experienced painter so I kept my colors very similar in case I screwed up. As I became more confident, I made the shading a little darker. I also painted the toenails a bright, happy magenta because I’m a lady.
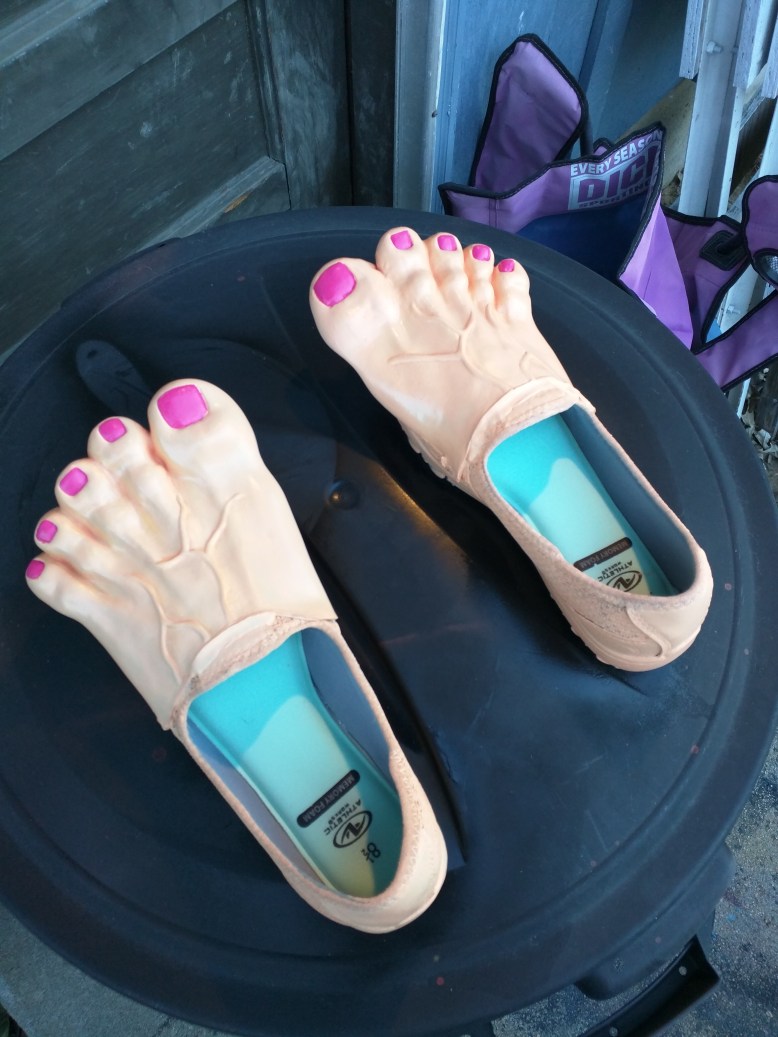
After the paint was finished, I gave them a good coat of clear acrylic sealant and started mentally preparing myself for the next, and most crucial, step: laying hair.
We all know that hobbits are supposed to have hairy feet, and I knew that hair would be the selling point of the whole costume. But I’d never laid hair before, and I didn’t exactly have a pile of hair lying around the house. … But I did have reruns of SyFy’s Face Off and a scrap of Rocket’s faux fur! So I settled down one evening and plucked the darkest strands out of the faux fur and laid them down, one by one, with a straight pin and a little blob of E6000. It took me about two hours in total to do both feet, and I could have done a lot more had my back not started to ache!
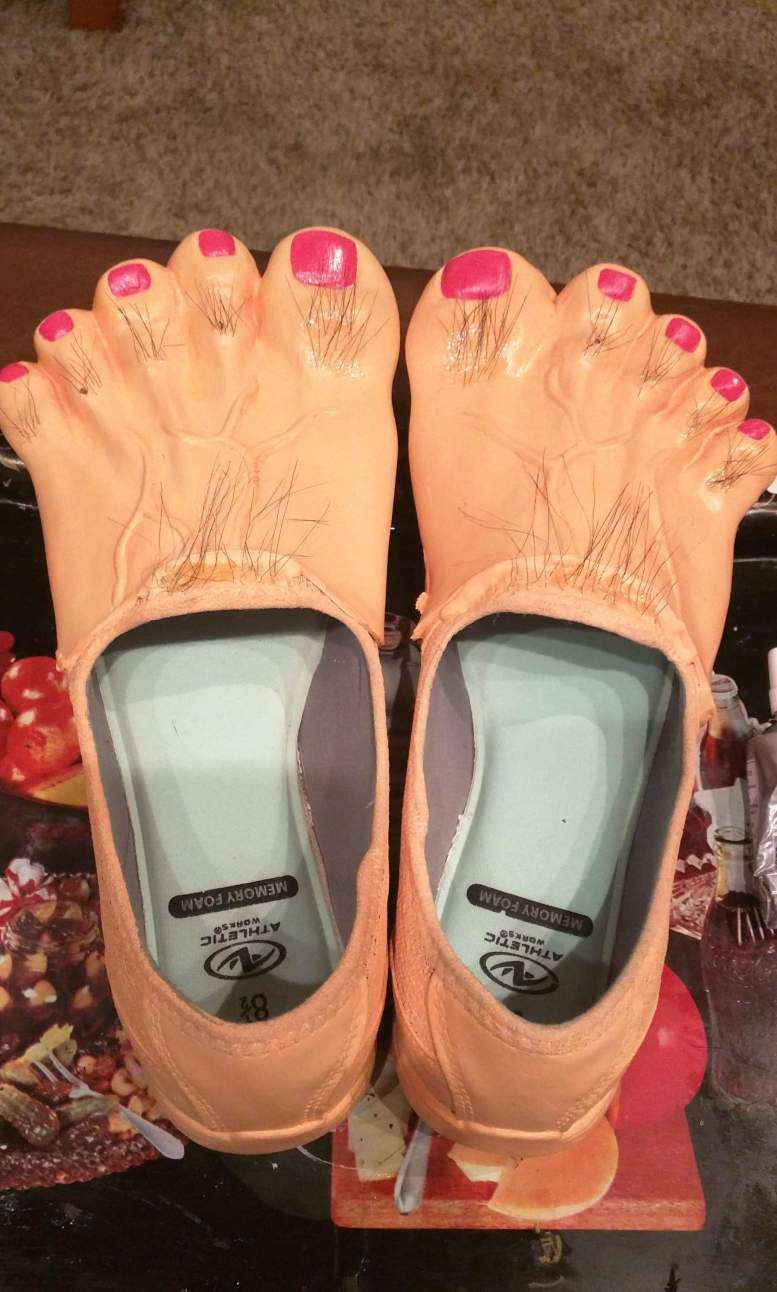
Some of the E6000 blobs got away from me and lifted specks of the paint underneath, and some places got a little chunky with glue residue, but all in all I really love how it turned out. The last step was adding in freckles with brown acrylic sprayed off a fat paintbrush and dotted on with a pin, and then I was officially done with the feet.
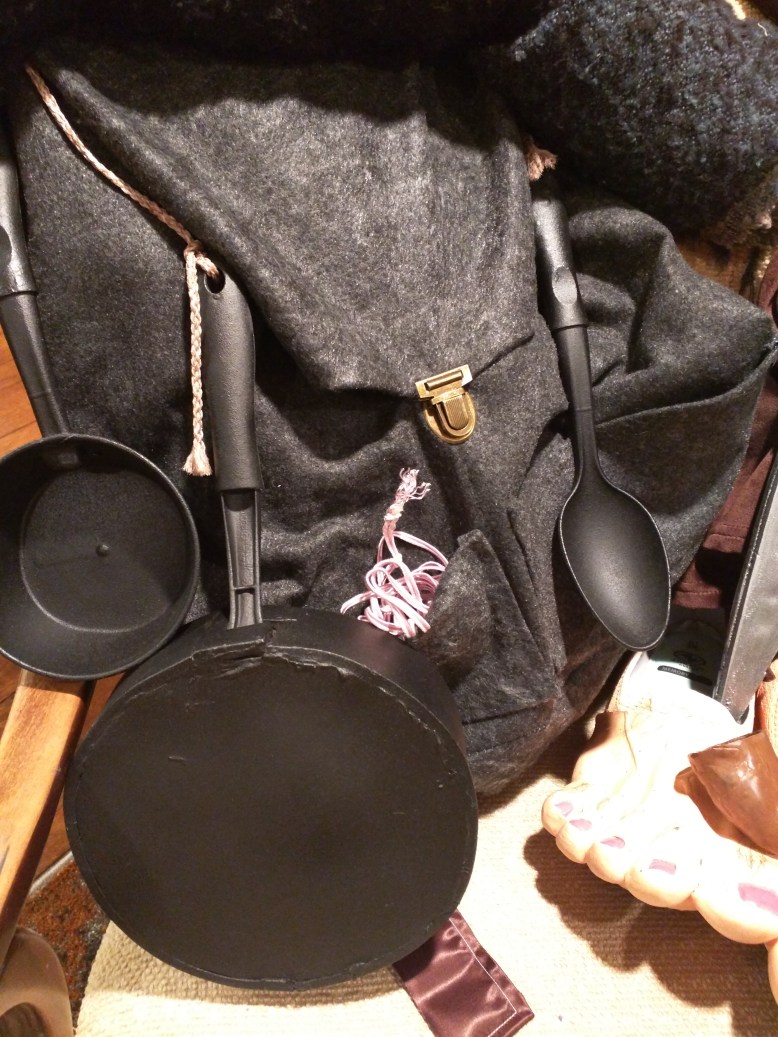
While I was waiting on the feet to cure or dry, I started working on the second-most important part of a Samwise costume: the backpack. Sam’s backpack is an iconic part of his journey to Mordor, between the pots and pans and herb salt and stashing vast amounts of lembas.

Sam’s pack from the movies (right) and his scale double’s identical pack (left). This is one of very few static reference images I was able to find.
I knew I had to have it. And I knew I was going to have to make it. I’d never made a backpack before, but thankfully I’d had some experience making drawstring belt pouches for renfest so I took the basic shape and structure and decided to just make it bigger.
My local Wal-Mart had pre-cut yards of sturdy, heather grey felt in the craft section for super cheap (like $3 a piece), and I used nylon drawstring, grommets, and a metal clasp I already had at home to create the basic pack. The pack is sewn together along the sides and base, and the top of the straps are sewn as well. The straps are a combination of satin blanket ribbon and felt scraps.

The flap is hot glued onto the body of the bag, as well as the pockets. They probably aren’t capable of carrying anything beyond a pack of tissues, but I liked how they looked. Under the flap, I punched in four grommets (two on each side) to allow ease of hanging for my other accessories (which we’ll get to in a second). I found a large blanket scarf in my closet and used it as a makeshift blanket roll, tied onto the straps with the nylon drawstring.
Fun Fact: originally, the backpack straps connected top and bottom to the bag like any normal backpack might, but I discovered during a test fit that there was no way to smoothly wear the backpack AND a cloak without detaching the straps from the bottom. The movie costumes must have had slits in the cloaks to allow for straps or they did what I did and tied the straps to one another behind the back and under the cloak (like you’d tie a bikini).
While the backpack doesn’t have much, if any, standalone structure, it looks great and does the job. It’s strong enough to hold my costume necessities (keys, wallet, safety pins, band-aids, etc.), but I probably wouldn’t trust it to hold anything heavier (like a change of shoes).
Now, for the accessories. This part was fun and I allowed myself to have messier edges since I didn’t have the right tools to create the flawless seams of my better-builder-counterparts. But I did have access to 97c cutlery (two spoons and a spatula were sacrificed for this costume), a $1.49 pack of plastic bowls and plates, hot glue, 5mm craft foam, Plasti Dip, and a super dull utility knife. Adventure ensued.

The plates served as a size guide for my frying pan’s base, and I cut two circles of black foam and two wall strips. The spatula is sandwiched between the two circles for stability, glued into place, and then the wall strips were glued around the edges. A gap at the back of the wall strips allowed the spatula’s handle to poke through naturally, and I used scrap foam to fill in the space around it.
A plastic bowl became the sauce pan basin, and I roughly cut a hole in the side of one so I could wedge a hacked off spoon handle into it and hot glue it into place.
Both pieces, plus a second spoon that I didn’t do any work to, were Plasti Dipped, given two coats of “Aged Iron” textured spray paint, and shot with a matte black paint at the end to cover some of the grayer tones of the textured paint. The goal was to create a convincing set of cast iron, and I think I accomplished that as long as someone doesn’t look too closely at the seams!
And now, just a short paragraph on the last two accessories: my smoking pipe and the terrible imitation of Sting because I decided I needed something to hold in photos and threw together these pieces one afternoon after work. They are NOT anywhere near my usual standards, but I kinda love them for that. Gotta let the little things go, right?
The pipe was roughly sculpted using a hunk of white oven-bake Sculpey clay and then painted in a few different shades of brown. It has no air holes and is very lumpy. Sting was bolted together using craft foam, a dowel rod, and the hacked off hilt of my nephew’s plastic ninja sword. It was hot glued and E6000’d, held together with binder clips while it cured, Plasti Dipped, brushed silver, and then the Elvish was slapped on in Sharpie while the handle was wrapped in scrap suede and silver marker scribbles. Ten foot rule, right?


The fabric components of my costume were both bought and handmade. As I said earlier, the bodice was purchased this year at renfest and the skirt was re-purposed from that same day’s costume. I cut off the bottom eight inches of a beige cotton broadcloth underskirt to make it hobbit length and left the hem raw. A yard of scratchy woven cotton became the apron after a few simple passes under the sewing machine’s needle. The brown velvet cloak has been in my wardrobe since my first trip to renfest in 8th grade (!), and the blouse is just a long sleeve cream button-down with a subtle stripe pattern. Hidden underneath my skirt is a set of lovely cotton knee-length bloomers that really made me feel whimsical and true-to-character, even if no one else saw them.
Oh, and the little “halfling ears” were purchased off of Etsy (or maybe Amazon?) from Aradani Costumes. I attached them with lash glue because I couldn’t find my spirit gum and blended my foundation over them as I did my makeup.
And that’s all, folks! I spent about four weeks building this costume with varying degrees of intensity and I’m really proud of how it turned out, all things considered. Are there adjustments I’d like to make? Sure. But did I have fun wearing it and watching LotR for a month straight? You bet your ass I did.
*AND YES, I KNOW THAT SAMWISE ISN’T IN “THE HOBBIT: AN UNEXPECTED JOURNEY” BUT I NEEDED A TITLE, OKAY?
Now, time for some potatoes. How do you prefer ’em? Boiled? Mashed? Perhaps in a stew?
—————————————————————–
Here’s the Super Simplified Final Cost Breakdown:
Feet – $35
Backpack – $15
Pans – $5
Bodice – $60 (usable with other costumes)
Skirt – $20
Sword – FREE (used scraps)
Pipe – $2.50
Apron – $5
Ears – $15


